
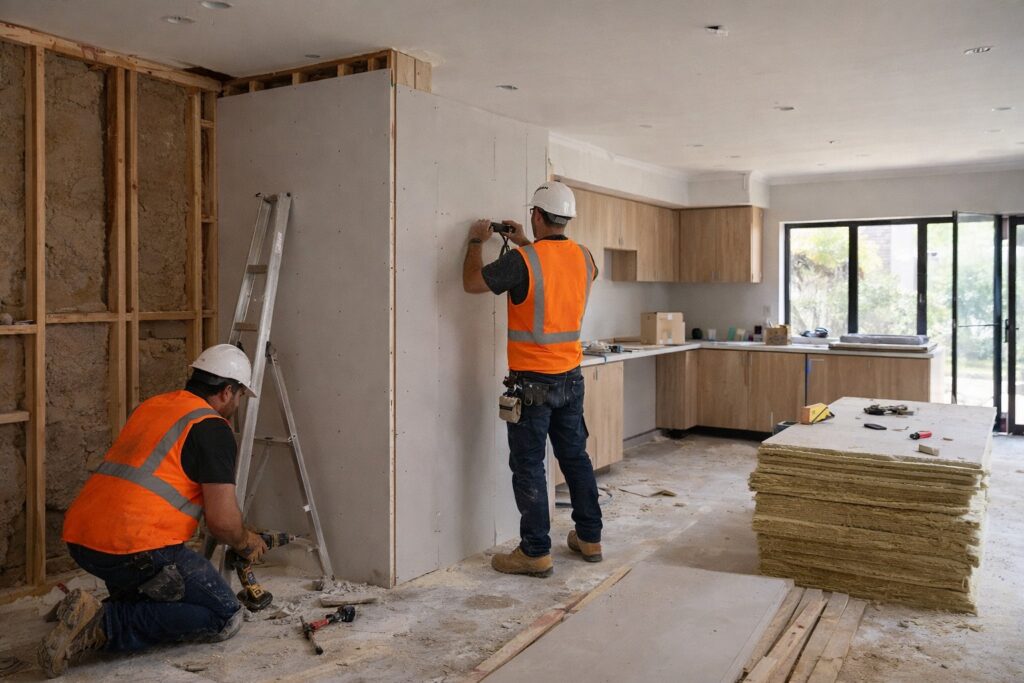
Are you considering renovating an older home home and don’t know where to start or need a second opinion? Sought quotes for trades that are out of reach of your budget? Considering DIY? That’s been my journey over dozens of sites over 25 years.
Before you consider knocking down or dramatic changes, a sustainable approach can bring similar or greater cost benefit to your home.
Growing up my family moved every year or two renovating houses as a source of income through the 1980’s and 1990’s, which left me with many jobs to do as a youngster and many learnings in the process. I stopped counting by my 26th house move!
This experience in no short part forms my happy place; always wanting to “improve or help something, somewhere, or someone”
I bought my first home at 21 and have been renovating and building ever since, including commercial carpentry, steel fixing, tiling, bricklaying, site preparation / compaction, earthworks, concreting, endless residential extensions, car ports, paving, roofing, retaining walls and even installing a pool.
Plan A has also assessed thousands of projects across my professional journey, seeing them from concept to completion.
Over such a timeframe, you see nearly every error, every ‘what it’ and every ‘i should have’. You learn what matters most and that varies if you its a home for life or if your just flipping a house for profit.
Everything aspect can save your time and project costs from taking a minimalist approach, retaining original building fabric, creative responses to challenges, improved room configuration and orientation, effective extension planning, material sourcing, consideration of ongoing maintenance, knowledge of approvals processes/exemptions, and designing and building to avoid fashion cycles (which date quickly and devalue your investment).
This is not ‘The Block’ or any such design service leveraging the latest trends and magazine fashion or major budgets. This is a ‘have you considered’ service supported by written and verbal advice and simple concept plans (if required) across five areas:
And if I can’t help, its free. I love seeing new project regardless.
Reach out to discuss what your up to and I’ll provide honest and helpful support. The goal is to save you thousands to potentially hundreds of thousand and avoid many headaches along the way.
The links below area just a few of my favorite personal renovation projects over the journey. I will slowly add to these when I get time:
______________________________________________________________________________________________________
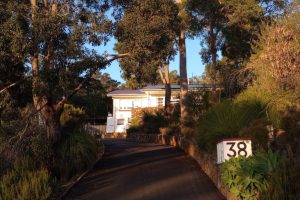
Lesmurdie 2860sqm 2022 – 2025:
Acquisition 2022 Cost: $715,000 plus stamp duty and settlement cost
Total renovation cost (excluding holding costs): Under $120,000. Renovation time – 3 years part time.
Renovation included: new roof, gutters, new pool, sauna room, new bedroom, bathroom renovation, painting exterior / interior, new patio, tiling / minor kitchen reno, flooring throughout, new patio, hot water system, air conditioner, cricket nets, converted cellar to music studio and new bitumen driveway of 550sqm.
I completed all work myself excluding driveway, electrical and plumbing.
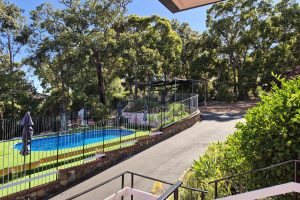
While the house is modest, there is four concrete stair cases in the curtilage of the property accessing extensive formal and informal areas with various vista.
This is the most recent and unique renovation to date. It certainly would suit most but the inputs and historical fabric were complex and to be respected where possible.
Before (must see!): https://www.realestate.com.au/property/38-nelson-cres-lesmurdie-wa-6076/
After: Pictures and Background below
Background
This was a tricky one. Probably my most challenging. Even the quote for painting (exterior, exterior, timber window frames / fly wire frames) alone came in at $45K. So, it was immediately apparent, I’d be doing another renovation myself.
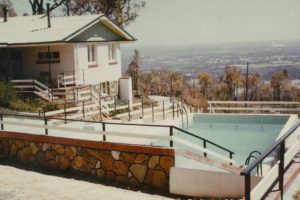
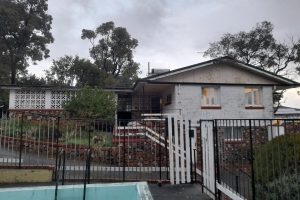
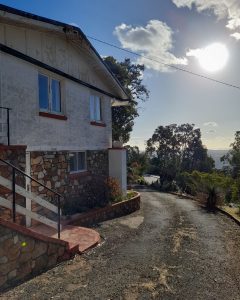
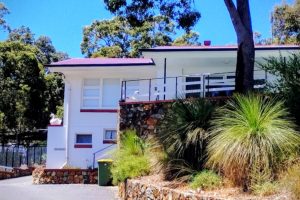
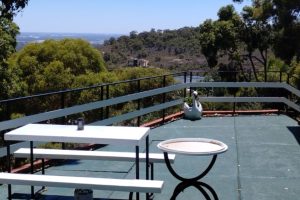
This very unique and potentially (future) local heritage listed property deserved a lot of love. An elevated site with sweeping views <50km north and south and even to the beaches and rear lighthouse at Rottnest Island. Definitely worth the effort.
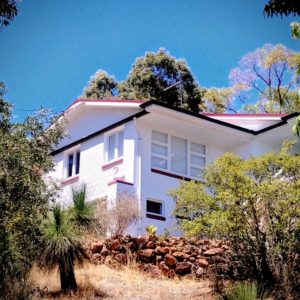
The house was originally built by the Tonkin Family as the first of three homes in the area in the mid 1950’s. Every weekend they would drive up from Como and stay in the shed, hand mix concrete bricks to a wooden frame – with patterned relief, let them dry and lay the ones they’d done the week prior.
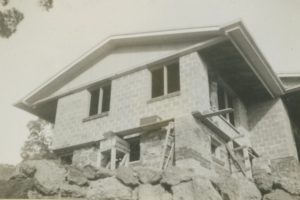
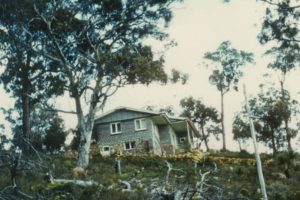

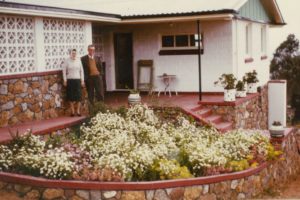
I’m amazed at the effort and genius in everything they did from solar passive design, beautify simplicity and hundreds of square metres of amazing feature stone work (from Mrs Tonkin). And to think, other purchasers were going to bowl it over and build a McMansion further up the site, it had to be saved! So glad the Tonkin’s agreed to sell to us.
This was a party house for the Tonkin’s for all their relatives in Perth, including many member thinking of it so fondly, their ashes are spread in the bushland setting overlooking Perth.
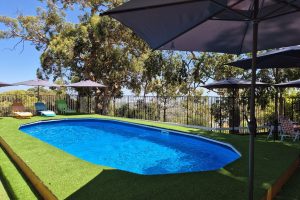
The Pool
The site even served as the local pool for Lesmurdie kids in the 1950s and 1960s. Mr & Mrs Tonkin created it with a pick axe axe chipping through coffee rock creating a concrete pool 11m x 5m and up to 2.4m deep. Unbelievable!

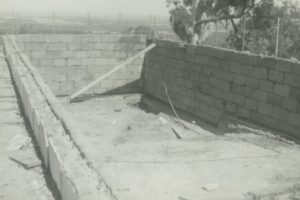
Unfortunately the Meckering Earthquake (1968) cracked the concrete pool and it was never fixed. By that stage, the Tonkin children were grown up and Mr Tonkin’s joy of swimming was troubled by no perception of up or down in the water due to an ear issue. Not worth the fix. Understandably in the subsequent 50 years that passed this monolith looked more like something from an abandon motel horror film setting.
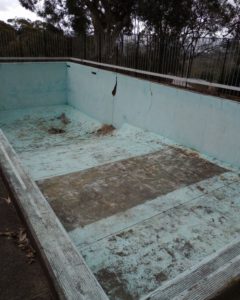
After researching many solutions and consulting many trades the costs for surfacing fixing alone was <$40K, before installing all new piping and mechanical infrastructure. Realistically, nobody was prepared to do it given outcomes were not guaranteed. Even a builder I’ve worked for said he’d spent months fixing his own and it failed.
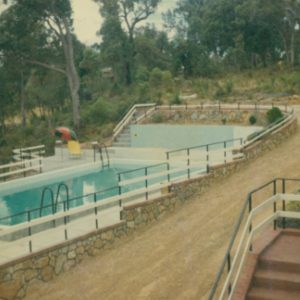
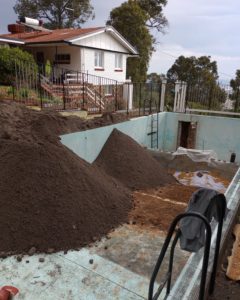
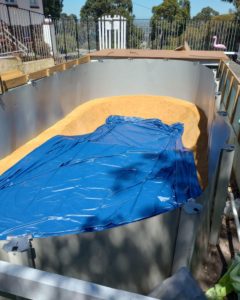
After much research, design, engineering, approvals and hard labour we had a pool and underground sauna room in its place, all self built. I installed 40 cubic metres of sand by hand and compacted with millimeter precision, building retaining walls and delivering a unique (hidden) above ground pool 8.8m x 3.8m (with deep and shallow ends) constructed within the shell of the above ground pool. A deck was built over the top and covering the surplus space a sauna room below. The extensive concrete steps, paving and seating areas around were so uneven and of such large scale, it was decided (in the short term) to use artificial turf and a mural to distract of the ‘patina’ of age (work with what you’ve got). Consideration here was given to the life span of the new pool, the potential for longer term use of the massive concrete shell (still structurally sound generally) for a two storey granny flat. And the need to just get rid of a massive eyesore asap immediately adjacent to the house that was nearing completion (sans the roof). Then entire cost $30K, all inclusive, including the pool, sauna and sauna room. Never as good as the original, but it will do for now!

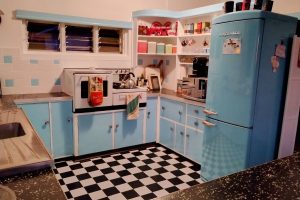
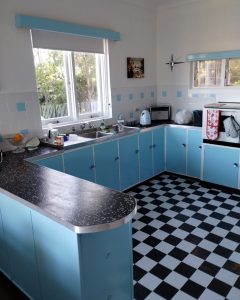
The Kitchen
After ripping out half a dozen perfectly good jarrah kitchens in my early years replacing them with modern rubbish of limited lifespan, my view is generally; work with it…if it suits your style. Those kitchens are rock solid.
We bought a Majestic 50’s style light blue fridge from Melbourne (about $3K cheaper than a Smeg) and decided to go for a 50’s diner look (albeit not red). Not the first 50’s kitchen reno i’ve done, but it will do for now, until we prioritise funds for some retro marble tops or similar laminate to complete the look.
Unfortunately the unique plastic wall tiles were so faded I had to retile sympathetically to the era. We’ve retained those plastic ones in the laundry which are in amazing condition. The checker floor pattern was an easy, cheap and quick stick on solution (1 hour) avoiding prior efforts removing 1950’s lino (at great expense to my lungs and brain cells – heating / removing 1950’s glue).
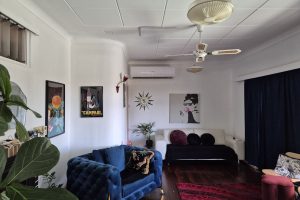
The Walls
Throughout the entire house, ever room, wallpaper falling off like the Adam’s family mansion. Even in the bathroom. After steaming about half of it off it became apparent that whatever remained was stuck. 10 days non stop rubbing every inch with hot water an a microfiber cloth revealed a hard rendered finely textured wall. Painted white and on the curved wall in the lounge room, this robust surface has come up better than any interior surface I’ve ever lived in, or potentially ever seen in my work either. Worth the effort at the end (if you have the time).
Decorated with a mix of furniture and art sympathetic to the era, we are stoked with the results and the cost.
Exterior
My son commented “this entire house is held up with paint and gap filler”. He’s correct, the style of the era meant every surface is painted and its an important consideration if your building, renovating or ever considering covering brick or feature brick that may well come back into fashion in the next decade (fashion cycles for exterior materials typically cycle ever 40 years). Cream brick 60’s houses are cute again, brown 70s starting to be sought after (well some of them!).
This is a particular bug bare of mine in my career professionally; that you can have a material finish that will last hundreds of years and you chose to cover it up with something that has a warrantee of perhaps 10 years, with the ability to return to what you had, extremely difficult if not impossible. But fashion is fashion. Who remembers suede effects walls? Lasted 5 years in fashion.
The exterior including timber windows expose to prevailing weather elements, whereby the renovation became a restoration. The major window needed six panels of removed, every transom and mullion pulled apart, the entire window frames pulled apart, every moving fixture and fitting pulled above, acid dipped, de-rusted, primed, rebuild and reinstalled. That took 8 weeks amongst other jobs for one window including breaking 4 glass panels. If I had my time again, i’d go direct to Vinsan’s Salvage in Bayswater and find a matching one (plenty of them) in good condition and just install it, even if i needed to adjust the window size (as I’ve done before). Unfortunately when I start a job, I have to finish it. I knew I was doing the wrong thing but I was too deep to in to back out. The lesson here is sometimes don’t be yourself!
Given the height and slope of the property working for several weeks sanding, filling and painting 5 – 6 metres above the ground on third world scaffolding kept me ‘focused’. That quote of $45K looked very accurate. However, when you consider your post tax income that would service that trade cost, being your own boss is sometimes much more economical for your wallet and your mental health. Working wife, very helpful also.
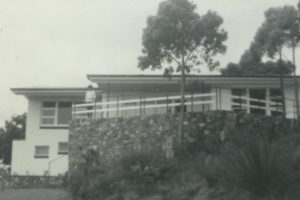
The original balustrades throughout are not building code compliant (to modern standards) but a unique feature to the era (galvinised steel and oddly, oak). There were restored to various standards considering the proximity to living areas, views and the time available. All originally made by Mr Tonkin, including the pool fencing. I’ve only ever seen this balustrade in one other location at the house my Grandad built by hand overlooking the Swan River in Nedlands in the 1940’s / 50’s. That balustrade was on the concrete viewing platform at first floor level popular at the time. The horizonal elements are particularly pleasing to the eye contrasting to the black steel work and horizon in the distance.
Concrete
The sprawling font deck and surrounds including four stair cases and a rear porch, pathways and the like were formed in concrete by the Tonkin’s, another example of their endless hard work. Being economical at the time using local rocks for fill therein renders some areas inconsistent in quality (cracking) given the time that has expired.
A key aspect of heritage buildings is the concept of the ‘patina of age’. The building is 70 year old and has so many unique features, it should not look perfect if your restoring it and being responsive to the original construction story and the Burra Charter (western heritage philosophy for built form).
I’ve resisted the urge to resurface concrete to its original perfection this time. In stead, using a high end plastic exterior paving paint product post high pressure spray. All exterior areas are, after all, subservient to the views . But in many years to come, some concrete resurfacing will be required.
Gutters
I’ve retrofitted modern gutters to timber facades of many 19th century era homes and its a pain! Nothing works easily, including the fittings / interface with the facia and drainage. I completed the works on this project only because I wanted to keep the original lead gutters in its original profile on the corners and on key elevations where they were in good condition as they will last another 50 – 100 years (much longer than any modern replacement). Where rusted (due to a lack of gutter maintenance) I replaced them with gutters of similar profile. If money was not option, I would have had some rolled with exactly the same profile and still will potentially in the future.
I’d likely saved $3.5K on labour from prior estimates, as a two man job for two days (for a professional). But this takes a lay person much longer. Best to get a good quote from a good operator and you can watch magic at work. The speed and efficiency and skill of a veteran is something to behold (metal cutting, moldings downpipes etc). If you have the money, pay someone good. Your roof and its correct drainage is the most important input to the longevity of a building, including its walls and footings.
Roofing
Having qualification myself and working for certified trades, removal of the hot water system and asbestos roof in full PPE kit in the middle of summer (entire week in the very high 30’s) required some serious ‘self settling’ mentally. It was a similar output physically to triathlons I did many years prior, albeit much hotter.
As a precautionary measure, I purchased an asbestos rated vacuumed and spent approximately 40 hours in full kit, suite and face mask squatting down balancing on ceiling joists vacuuming up 1980’s ‘cool or cosy’ insulation (loose material pumped in) to ensure there was zero asbestos residue blowing around in the ceiling in future (best practice). I also painted the tops of any eave materials remaining to ensure pests such as possums weren’t disturbing material.
This process was brutal and I was out of action at some point for an entire week with back spasms.
Re-strapping the jarrah roof (which was in great condition – thanks to the asbestos) to the walls and other spot fixing to modern code / design standards was a comparatively pleasurable element to ensure structural stability in a high wind locations (now without the weight of heavy materials holding it down given the colourbond replacement).
Its a very sad thing asbestos causes health issues as it is otherwise a wonder material (R Value, strength, longevity, fire resistance).
The entire roof / ceilings / sarking was replaced to a higher R value that required by modern buildings and house now performs better than any home I’ve lived it (even with many louvered windows). Courtesy in part to double brick cavity concrete walls, painted white externally.
I would not recommend anybody undertakes any of these task given the qualification, legislation, pain tolerance required, including working at heights for which I have the necessary license. The cost savings here were around $50 – 60K and the process was three weeks but it took me six (lost half the time to back spasms, unseasonal rain and material delay – 1 week each item).
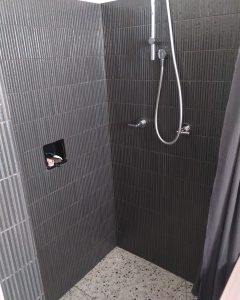
Bathroom
This was mentally challenging in terms at arriving at an appropriate solution. It included visiting nearly every tile shop in Perth over a three year period and giving up multiple times.
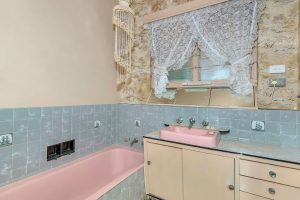
A pink cast iron bath and sink, blue grey plastic tiles with no proper water proofing, amazing authentic Australian bushland setting wallpaper (zoom in), seventies brown mosaics and fluted louvers, there was a lot going on. So this was left to last.
Previously i’ve gutted these type of bathrooms, even removing the concrete floors and reinforcing and starting again from sand pad up. But his had some really cool elements and even black gloss wall recessed soap dishes, funky but tired cabinet and unique mirrored angle wall cabinet. Removing the 70’s floor tiles I found some 50’s original mosaics in the shower that were ‘to die for’. That brought me great sadness that they tiled over and removed them in the rest in the rest of the bathroom. That’s a lesson there. They are back in fashion now.
Having previously removed a similar bath, dropping it while vertical and crushing my leg, I was apprehensive. These baths are a 1/4 inch thick cast iron and a very difficult lift for two large men carry, clear of any obstacles. The last one I removed required two car jacks to get it out of the brick build up. Even the basin (rusted) was difficult to carry.
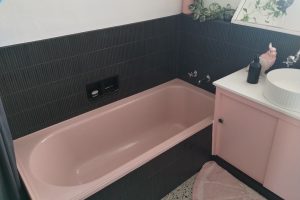
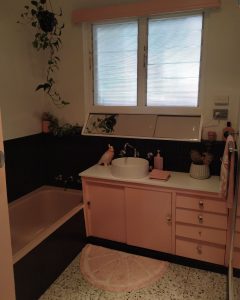
With my wife’s encouragement, we decided to work with it, particularly as the plumbing was still in good order and the bath in good condition and far superior to any modern replacement in quality. Post waterproofing elsewhere, I went with a tiling scheme which included a homage to the era, with replica terrazzo flooring throughout the wet areas, passage and new entry (below). Elements of pink flecks matching in with the bath. Only $900 in bunnings floor tiles. Winning!

I went ‘safety mode’ and used a wall tile from a prior renovation in Kensington (the best bathroom i’ve ever done), but it didn’t work at all (contrasting textures / finished). I asked my son, he confirmed, ‘It doesn’t work dad’. About 2 sqm of new tiles removed quickly. Save for another job. Rethink.
We took a similar ‘pink’ musk toothbrush cup holder to the tile shop and and offcut from the floor tiles. The finger mosiacs we found worked in with both the replacement basin pattern and fluted glass louvers. However, the cost! Eight times the price of the failed wall tiles per sqm. This was my one project exception on cost. Terror replaced optimism, this had to work and it seemed to match our samples. The entire bathroom was under $5K at completion, including replacing mirrors, all tiling, water proofing, painting and adornment. This is one of my cheaper bathrooms, but respecting the original elements required some negotiation.
On the latter, I was not happy originally with the results after 3 years of head scratchng, but my wife accessorised amazingly, the black soap holders and cabinetry retained and embellished. Its grown on me. Its particularly joyful to see any visiting ladies and teenage girls loving the pink theme! Not for everyone, but the era was bold, so it suits.
Landscaping
After many years of developing and maintaining European landscapes in Australian conditions, we’re totally over it. A lot of work and no environmental (weather) context that made any sense. Plenty of water wasted too. Hence this bush block which is so original, its even included in some environmental literature on line having examples of pre European native grasses.
Of more importance, established gardens are like liquid gold. Work with them, embellish them, the cost savings are immense and if anything’s out of fashion, plant something in front of it or thin it out and let it add to a depth and texture.
The two keys to selling houses is clean and green. Establishing gardens is an exercise in longevity and extremely costly.
The major of landscaping here has been maintenance only, minor embellishing small portions of garden areas around the house that had non-native vegetation, with exclusively succulents borrowed from other cuttings (and a few wild looking ones too). The impact is amazing, totally sustainable, near no water, no stress and basically no cost (all my wife’s work).
I’d never go back to the dozens of other gardens i’ve built and maintained, but everyone has to endure that journey to understand and work with what pleases them and their site context.
Bushfire Mitigation
Having spent 27 years as a town planner, bush fire is a relevant part of our role and the locations i’ve worked in. This includes assessing and reviewing consultants reports in bushfire prone areas pursuant to State Planning Policy.
This lot has a 45 degree slope to its west accommodating significant views, but also the highest category of bushfire risk classification FZ (flame zone).
After all the above effort, I’ve put together a bushfire evacuation plan, fire fighting facilities on site, and an automated sprinkler system to mitigate ember attack to the roof, gutters and openings.
As my university lecturer Dr Allan Pilgrim said when we studied natural hazards “nothing will save your home in the worst conditions, regardless of your build quality / materials”. But most dwelling burn down not facing these conditions.
Recent ‘its to late to leave, stay in place’ message via the Emergency WA app for various suburbs in proximity to mine have instigated my doubling down and putting in a reticulated fire system for the dwelling and its surrounds to mitigate ember attack. Particularly as the gutters can fill with leaves in as little as two days in windy conditions.
Leveraging my experience, and months of further research, I now design these sytems commercially including installation if you don’t want to install yourself. My primary driver here: i’m not entirely comfortable with what is being sold on the market and the transparency regarding the likelihood of those systems working in various bushfire conditions; and helping our community. Please visit my other tab for further information. Again maximum effectiveness and cost efficiency were my primary drivers to protect my family.
My opinion is you should always have a plan and evacuate when you can. These systems can be left on when you leave or if your not allowed to and will assist mitigate the most common reason your dwelling will catch fire (i.e. ember attack, not from direct flames or ambient heat).
Conclusion
With family close by and an outcome / vistas as unique at this property, this is a home for life. Endless land to extend, build another home for the in laws and many other projects, the possibilities are endless. With working from home, having this amount of low maintenance land 16 kilometers from the City with view of it, would be very hard to part with. Recent house sales for larger newer homes on smaller lots with similar view in this street are several times our purchase price (obviously ours will be less as a smaller older home). This view, land and proximity is a limited commodity.
This house has so many elements from the houses I’ve remembered from childhood moving and renovating that collectively fill me with a sense of familiarity that adds comfort, like returning to a single home you lived your whole life. I’m truly grateful to the Tonkin’s for passing the property onto us and hope our efforts are a testament to their achievements and the happy times they have had here. We are having a catch up soon inviting the Tonkin clan for a BBQ to say thank you as they’ve maintained contact for updates.
As always, as soon as I finished the above, I’ve started scoping new project in regional WA as Perth house prices are very prohibitive. Further updates soon and again, its likely an even more challenging that this project!
___________________________________________________________________________________________
Finchaven Street, Kensington 680sqm 2015
Acquisition 2009: $650,000 plus stamp duty and settlement fees
Improvements: $85,000
Again all works except plumbing, electrical and rear patio were completed myself.
My parents had lived in Kensington in the 1970s having their first house there, purchased for $12,000 and it had always been an aspiration of mine to live there again. So many good friends and memories growing up in proximity (Vic Park / St James) was also a driver. Plus the location. 2km from the Swan, 4km as the crow flies to the City, as a young family in you 30’s, hard to pass up. Only needing one car in that location was also a bonus.
Post the 2005 boom not much happened in residential property in Perth for a long time if you consider the entire housing typology spectrum (apartments included). Yes there was a bump towards 2012 / 2013 but for Perth, this was just deferred GFC, artificially propped up my mining. Of course in the last three years to 2026, its been crazy.
Property doubles every 7 – 10 years traditionally but Perth seems to be cyclical to some unknow sun God and rises with all hell and fury and goes back to sleep for a decade(s). We decided to sell given the tree change opportunity (amongst other things).
Regardless here’s what we did.
The house was a traditional war service home, a very basic 2 x 1 with an annex (sleepout) to the rear. It had been rendered to a high standard in the 90’s with a slim complementary side extension featuring a new lounge room in double brick. The remainder of the house was largely original.
These late 1940’s builds were austerity times where building material were in short supply and there were mandated maximum sized for residential dwellings in Perth. Embellishments were limited and a stark contrast to the style and sophistication of decades prior. The building, with limited exceptions, was a shell, original fire place removed, a few walls knocked out, original kitchen, new stove, a Kensington classic. And at least 30 years out from its last update.
Before:
https://www.realestate.com.au/sold/property-house-wa-kensington-105351169
The Plan
I spent several years in Autocad design detailing various single story and two storey additions including costing second storey loft style option. I was going to do all work myself, excluding plumbing and electrical. Then common sense kicked.
The second storey addition would constrain the lower floor living spaces with the stair, the upper story was loft style and the ROI would be good, but not transformative. With the large shed, there was also little space on the lot to extend or do anything else. Retaining the shaded gardens were paramount with a young family.
In designing a single storey rear extension, I eventually realised much the same could be achieved with limited costs within the same building footprint with some creative changes to the elevations, reorientation to the pool, new deck, walls removed and minor adjustment to the rear lower roof pitch. The major improvement was internal circulation, views, new kitchen, entirely new and expanded bathroom and major internal reconfiguration freeing up space for a third bedroom. This work was all completed over a three month period with only one structural beam added. Most of the costs for this project was around the significant relocation of all services required which I generally avoid.
Every square inch of this property was worked on or modified, to many jobs to list, but the results were worth it. Reinstating the fireplace, knocking out the front major window and putting in a recycled feature front window, verge plants and a new porch balustrade made a massive difference to the street presentation. Adding a replica pillow face limestone front wall and timber infill, along with landscaping improvements and a little basketball court also helped. This became the party house for all and sundry for many years and and we had many skeptics when we sold it for a tree change. Plenty of good memories regardless.
After (almost unrecognisable):
https://www.realestate.com.au/property/3-finchaven-st-kensington-wa-6151/
___________________________________________________________________________________________
More stories to come:
Another Kensington Renovation (2002) – Entire house and garden (3 months) – $20,000
East Cannington New Build (2003) – $110,000 (Project Home Build)
Andrew Street, Busselton Renovation (2008) – Bathroom, Kitchen and additional bedroom (six months) – $12,000
Cannington Renovation (2012) – Kitchen, Bathroom, interior and minor exterior (3 months) $20,000
East Perth Apartment Renovation (2014) – Demo and replace kitchen and minor interior (3 days!) $3,000